Monday 24 May 2021

Beautiful sparkly Craft Buddy Crystal Art

Hello again everyone, its been a while since I last blogged about crystal art, but I've picked up the pick-up pen again and am really finding it beneficial.  It all started a while back as you can read in previous blogs, but Mum had to go into hospital suddenly  and I had to do something to keep myself calm as she was not allowed any visitors and I dug out this beautiful picture of the windmills and tulips and managed to complete it in three weeks.  It was like welcoming back an old friend and it made me sad to realise how much I'd missed it.

Here is my finished picture:


I think you will agree that it is really stunning and I adore it, I found it very therapeutic and relaxing and it kept me occupied the whole time Mum was away from home.

Now, I ended up having a trip to the optician and they found I had an eye problem along with suspected high blood pressure, which I new I had the perfect source of remedying.  I picked out some greetings cards and have not looked back since, it has lowered my blood pressure back to normal and my eye problem is still undergoing investigations - I have a retinal vein occlusion in my right eye and am back to the hospital this coming Thursday.


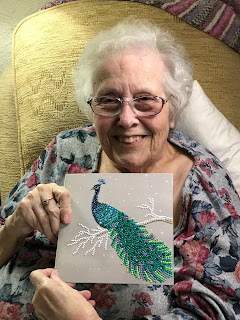
The best news is that Mum who is 80 in July and has mobility problems as she is on crutches all the time and finds it difficult to do her knitting all day due to pains in her hands has also started doing crystal art again.  She is really enjoying it though Lucy our Corfie doesn't seem to agree in this photo as she wants cuddles.

I cannot reiterate enough the benefits of taking up crystal art, it is relaxing, therapeutic and good for your health if not your bank balance.

Craft Buddy Crystal Art is simply the best and I would not purchase mine from anywhere else!  Highly recommended from me.

The greetings cards are priced at £4.99 and are beautifully packaged with all the materials you need and have some wonderful images.  A great starting point if you have not done crystal art before.

Look how amazingly packaged the cards are:


If you are looking for a smaller project, why not try some of the motifs/stickers, these are fab for children to complete,we've used them here to decorate our mobile phone cases and finished off with some crystal art sealer to ensure that the crystals do not come off.


The cards are so varied and beautifully sparkle please see a few of our completed cards and some pictures of Mum enjoying her crystal art.


I hope you enjoyed this blog, please stop by again soon if you did and follow my post for new releases and updates from me about Craft Buddy Crystal Art.

Friday 19 June 2020

Knitting, crochet and squishy yarny loveliness

Hello again everyone, welcome to my blog.  I'm trying to put in a huge effort to blog more often and perhaps even once every two weeks, depends on how much crafting I've done and what I've bought!! I’ve got this idea from watching a few podcasts whilst I’ve been on lockdown I’m not one for videos so this is the next best thing.

I hope that you are all keeping well and managing to keep yourselves busy?  Its been hard, I know For many of you. I’m lucky that Mum and I get on so well. She is responsible for my love of knitting and yarn. Mum and I would have gone crazy if it not had been for the fact that we both knit and crochet, it has passed many, many hours.

Here’s mum modelling my half finished corner to corner blanket. 


My work came to an abrupt halt and I've spent most of my days since lockdown began knitting or crocheting with a bit of gardening in between.  At first I found it hard to settle and concentrate on anything but as our 12 weeks have worn on it has become a litte easier to relax.  Work has just started to pick up again which I'm really pleased with.  Its been a worrying time for everyone but hopefully now we are over the worst.

I’ve bought a lot of craft stuff since the middle of March, some rubber stamps from Creative Expressions, some gilding flakes amongst other things.

My best gadget has been my Knit Pro wool winder I don’t know how mum and I have managed without one. It’s wonderful knitting with yarn cakes.

I’m a member of the Winwick Mum’s Facebook groups and one of the prominent members called Janice sadly passed away suddenly and Christine organised a lovely fundraising event. There were project bags, some gorgeous hand died yarn and stitch markers on offer. Was a really lovely thing to be involved with. Janice helped so many of us including me on our sock journey.

Here’s the wool I bought I can’t wait to start something with it. I just have to decide what to do.


This yarn is just so soft I cannot wait to knit with it, just need to decide what to make with it.  Decisions, decisions.


I thought this personalised label was a fantastic idea.  Thank you Teri x

Here is my other yarn

This is a beautiful colourway.  I cannot wait to work with this either!  So many projects and so little time.

Other purchases recently have included this gorgeous Stylecraft Head Over Heels.  I couldn't help myself as it was reduced from The Knitting Network.


I’ve started watching podcasts. I know I’m a bit late in the game but I’ve been enjoying Crafhouse Magic and Crafternoon Treats.   I've found them so inspiring and made me want to do my blog again.

I’ve been doing a lot of knitting and crochet over the past few weeks. Mum and I are currently making hats for Queen’s Hospital Maternity Unit. Anything to keep us busy.

I have a few WIPs, a pair of socks, a ripple blanket, a jumper, I won’t be bored.

Here is one of my WIPs.  I'm on the foot now, then have to make its mate.


This is worked in West Yorkshire Spinners Signature 4ply in Pink Flamingo, its striping up very nicely.

My finished object:
This is the pattern close up.


Ta da, this was so quick to work up.  Yarn is James C Brett Partytime.

Unfortunately this week has not been a good week.  We sadly had to say goodbye to our little Isla who had a short illness.  Its been totally devastating and is going to take us a while to get over.  I shall miss my little friend she loved to snuggle up on a blanket I was crocheting.

Anyway, enjoy your crafting, I will be back soon with more yarny loveliness.

Take care and keep crafting.


Tuesday 17 March 2020

I'm Over the Moon with Hunkydory Moonstone Dies

Hello everyone, its been a while since my last blog but I'd like to share with you this amazing card I made using the Hunkydory Frame Creations die set which is part of the fantastic Moonstone die range by Hunkydory.


I hope you are all keeping well, Mum and I are on day one of isolation, its such a worring situation and a scary one to be in and if like me you find yourself isolating as you are a carer for a parent or loved one its not going to be an easy ride for any of us.  We have had phone calls and messages from neighbours offering to get us supplies if needed but thankfully we are ok for the moment, we haven't gone mad and stock piled, but I rely pretty much on shopping being delivered as Mum is prone to having falls so as we speak no slots available for deliveries for two weeks so I've had to think outside the box to come up with solutions to ensure Mum and I have what we need to survive the next three months.  I'm also diabetic so have my own issues to worry about but one thing I won't run out of is craft supplies.

Anyway to make this card you will need:

1. Moonstone Frame Creator die set - code MSTONE102
2.  Two sheets of coordinating Adorable Scorable.
3.  One sheet of gold mirricard.
4.  Topper set of your choice - for this card I've used one from Beautiful Birdsong.
5.  Coordinating gems of your choice.
6.  Coordinating ribbon of your choice.
7.  Red liner tape.
8.  Wet glue of your choice.
9.  3D foam pads.
10.  Hot glue gun.
11.  Bone folder.

Step One
Using the large die cut four of the panel pieces to make the frame.  Crease along the fold lines with a bone folder and then put a strip of red liner tape along the flat edge as shown in the photo below.  Remove the red film and carefully assemble the frame pieces sticking the flap with the red liner tape on to the outside of the top flap.  (This will make sense when you assemble).


You should then have four frame pieces looking like this:


Stage Two

Start assembling the frame as shown.  Hunkydory have produced a really great video showing you how to assemble this frame which I will add a link to at the end of my blog for extra assistance.


I found that using a strong adhesive like the construction glue by Hunkydory worked better than red liner tape as it gave a bit more wiggle room to ensure the pieces of the frame were together correctly.

Stage Three
Cut a coordinating square and stick the frame onto the square to provide a bit of strength to your frame.


Stage Four
Using your selected decoration part of the die set cut four decorative panels out of mirricard. Using your wet glue carefully stick these around the frame.


Stage Five
Using the topper set make up the square picture as shown in the photograph below remember to use foam pads to give some extra dimention and lift to the die set.


Stage Six
Finishing touches - I've used a tag, attached a pretty bow and some gold gems.

Ta da
And Voila the finished project.  I've been making a few cards using the Moonstone dies please see the photos below.  I love using dies, they are really so versatile and can be used in many different ways.


Hope you have enjoyed this blog, will be back soon with another project.

Here is the link to the Hunkydory video on how to put this frame together. 

Hunkydory Frame Creation

For any Hunkydory products please visit the website www.hunkydorycrafts.co.ukwww.hunkydorycrafts.co.uk

Keep crafting! 

Love

Tracy


Friday 2 August 2019

Scotty Dog - Tonic Blast From The Past

Hello everyone, its been a while since you have heard from me.  I've still been crafting but have been rather naughty and neglected my blog for a while.

I'm currently not doing any design team work and miss it desperately.  So to fill the gap and my time and get me in my craft room I've decided to restart my blog.

I figured that as I have many Tonic dies some of which remain unopened and unused I thought I would get them out and do a "Blast From The Past" feature.  I love my Tonic dies so much and Tonic is an amazing company.  When Mum fell a couple of years ago she received such lovely cards from Tonicaholics it really cheered her up when she was in hospital.  She has them all in a box and whenever she is feeling a bit down she gets them all out.  I've discovered at through the rough times I've had over the past few months who my friends are.  But that is all water under the bridge and I'm back.

The finished project


For this tutorial you will need:

Tonic Dies
1.  Tonic Bowscale Die die - 1215e.
2.  Tonic Essentials Octagon Layering Die 1522e.
3.  Tonic Scotty Dog Roccoco Die 1188e.
4.  Tonic Birthday Wishes Minature Moments Die 1243e
5.  Tonic Essentials With Love Strip Sentiment Die 2352E

Cardstock
1.  8x8 Cardblack or two pieces of A4 250-300gsm.
2.  Fuscia pink craft perfect.
3.  Black craft perfect.
4.  Silver foiled/mirror card.

Adhesives
3D foam pads.
Wet glue -  I cannot recommend Tonic and Nuvo glue enough they are amazing.

Embellishments
Nuvo drops.

Step One - Creating matts and layers

Using the largest bowscale die make an 8x8 card blank.  Taking the next three dies, cut one piece of black using the second largest die, one piece of silver using the third largest die, and finally a piece of fuscia using the fourth largest die and matt and layer black using wet glue, silver add foam pads and pink add foam pads and stick to your card.

Step Two - Octagons

Using the second largest die cut two pieces of black card.  Using the third die cut two silver octagons.  Using the fourth die cut two pink octagons and matt and layer matt and layer them up the same as the base layer and stick one in top left corner and one in bottom right corner as shown on the finished card.

Step Three - Scotty Dog

Cut and emboss two Scotty Dogs - one in black and one in silver.  Create a drop shadow effect using wet glue and then mount the two die cut images on 3D foam pads and stick horizontally across the middle of your card.

Step Four - Sentiments

Die cut two Birthday Wishes - one in black and one in silver and one With Love - one in black and one in silver.  Create drop shadow effects with both of them and stick the Birthday Wishes top right hand corner and With Love bottom left hand corner.

Step Five - Embellishments

Add your Nuvo Drops - taking care not to smudge them and leave to dry.


Step One
 
Stage Two


Stage Three


Stage Four - Birthday Wishes

Stage Four - With Love
Completed project
I hope you have enjoyed this tutorial.  Why not leave me a comment if I have inspired you to get those older dies out of storage and love them again.  You can follow me on this blog or my Crafting With Tracy  Get crafting and enjoy your Tonic dies.  Special thanks to Crafty Cameron and Owain for your ongoing support.


Sunday 22 April 2018

Dawn Bibby/Craft Buddy Lantern Tutorial

The finished project
Hello everyone,

Hope you are all well and enjoying the sunshine.  Sitting here writing this, I should really be working, but will catch up shortly.  Price Drop curently on with Charlie on Hochanda.  Always a bargain to be had here.  Its been a busy time here. Friday I was at the Excel Centre with Crystal Art helping Gary with the make and takes.  Was lovely to meet lots of people.  Had a lovely day.  Next Saturday I'm off on a distress ink course at That's Crafty.  Looking forward to that.  Its been a while since I blogged and thought I'd best start posting tutorials like I do on my Hochanda Blog Ambassador Slot.  This time its for a lantern made out of MDF, brilliant these are as with it now the time of the year to sit out in the garden, you can put battery operated fairy lights in them or LED candles.  If you leave them outside overnight you will need to pain them first with a suitable sealant.

Hope you like this.  For this project you will need:
MDF lantern.
Dawn Bibby's pink poppy box.
Hot glue or silicone glue.
Resin flowers.

Stage 1: Build your lantern using the instructions provided in the box.
Stage 2: Decide if you would like to seal the lantern or have it open like this so you can take things in and out.
Stage 3: Add your flowers and embellishments
Hope you enjoyed this quick and easy project.  Here are the links for the products used:

See you next time xx